

Intro
In the last two posts, we explored the fundamentals of generative AI and its use in cybersecurity. Today, we’ll take a simple, high-level look at how AI presents information, why that matters for defenders, and how Retrieval-Augmented Generation (RAG) allows us to incorporate extra knowledge into model answers. To finish, we’ll walk through a lab to help you understand the key ideas discussed in this post and to spark your creativity.
How AI represents information?
Artificial Intelligence (AI) encodes information using numerical formats such as vectors, tensors, graphs, sequences, and probabilistic distributions. These encodings reveal patterns and relationships in data. They can be manually crafted through feature engineering or automatically learned by models, such as deep neural networks generating embeddings.
These representations form the basis for various tasks, including classification, regression, clustering, generation, and planning. The effectiveness of an AI system relies on the quality of these representations, along with data, goals, model architecture, and optimization methods. In practice, vector embeddings are especially important because they enable semantic similarity search and retrieval.
Why RAG?
Large Language Models (LLMs) are trained on large amounts of static data, making them capable of many tasks but often lacking in specific areas. Since training has a fixed start and end, models are unaware of events that occur after their training period. As a result, models can hallucinate, producing incorrect content. Although models can be retrained or fine-tuned with new data, this process is complex, time-consuming, and expensive.
To overcome this limitation, users can provide additional information through prompts. However, this approach is limited by the context window and may not always yield optimal results.
You might wonder: what if the model needs access to private, domain-specific, or frequently updated datasets?
Retrieval-Augmented Generation (RAG) bridges these gaps by fetching relevant data during queries and supplying it to the model as context, grounding the output in your data. In short, RAG enables AI to combine built-in knowledge (from training) with just-in-time external information.
To make this process efficient, the data must be “prepared” using an embedding model that converts content into high-dimensional vectors. These vectors are then stored and indexed in a vector database, enabling fast semantic similarity searches. Let’s explore this concept further with an analogy.
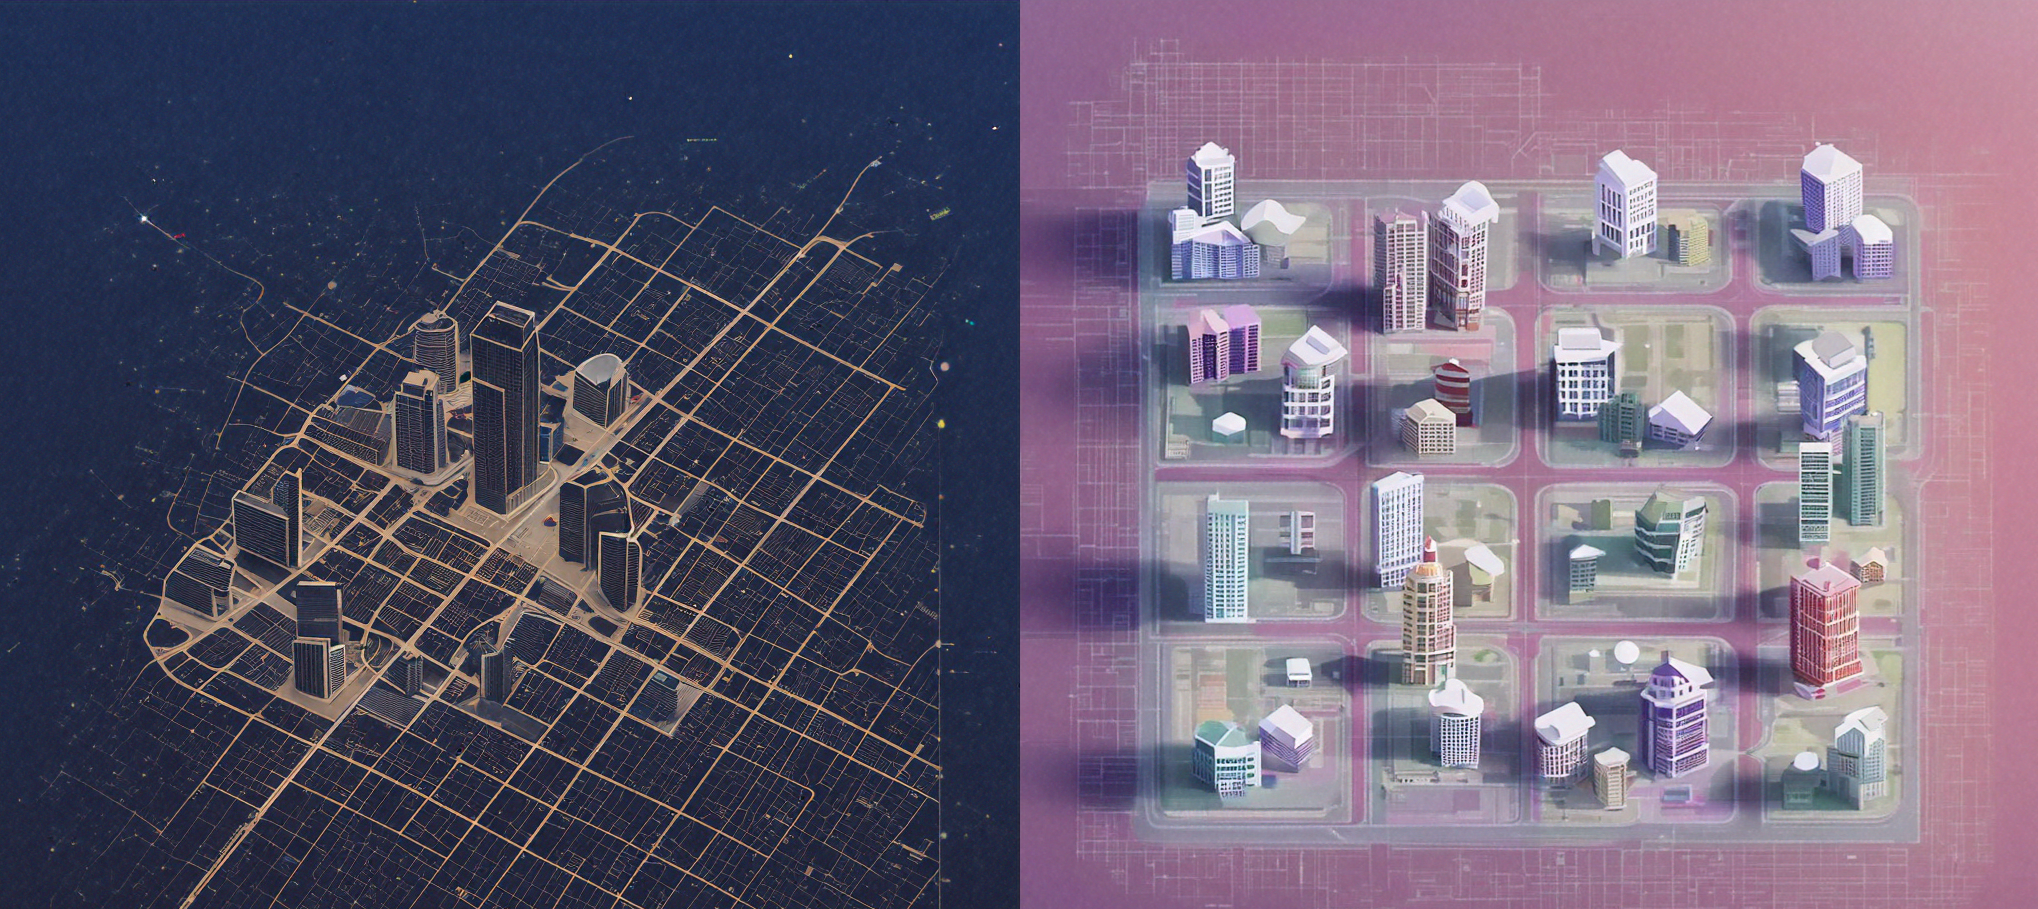
Vector City Analogy
Data representation (R)
Imagine a city called “Vector City” displayed on a 2D map. Each building—representing a part of the document—is embedded by an embedding model and stored in an index (this process is called embedding).
This setup allows for quick retrieval and helps the system find semantically similar content—even when the exact words or images aren’t identical. In other words, embedding enables a system to understand meaning, rather than just keywords or visuals.
Illustrations below represent the described process
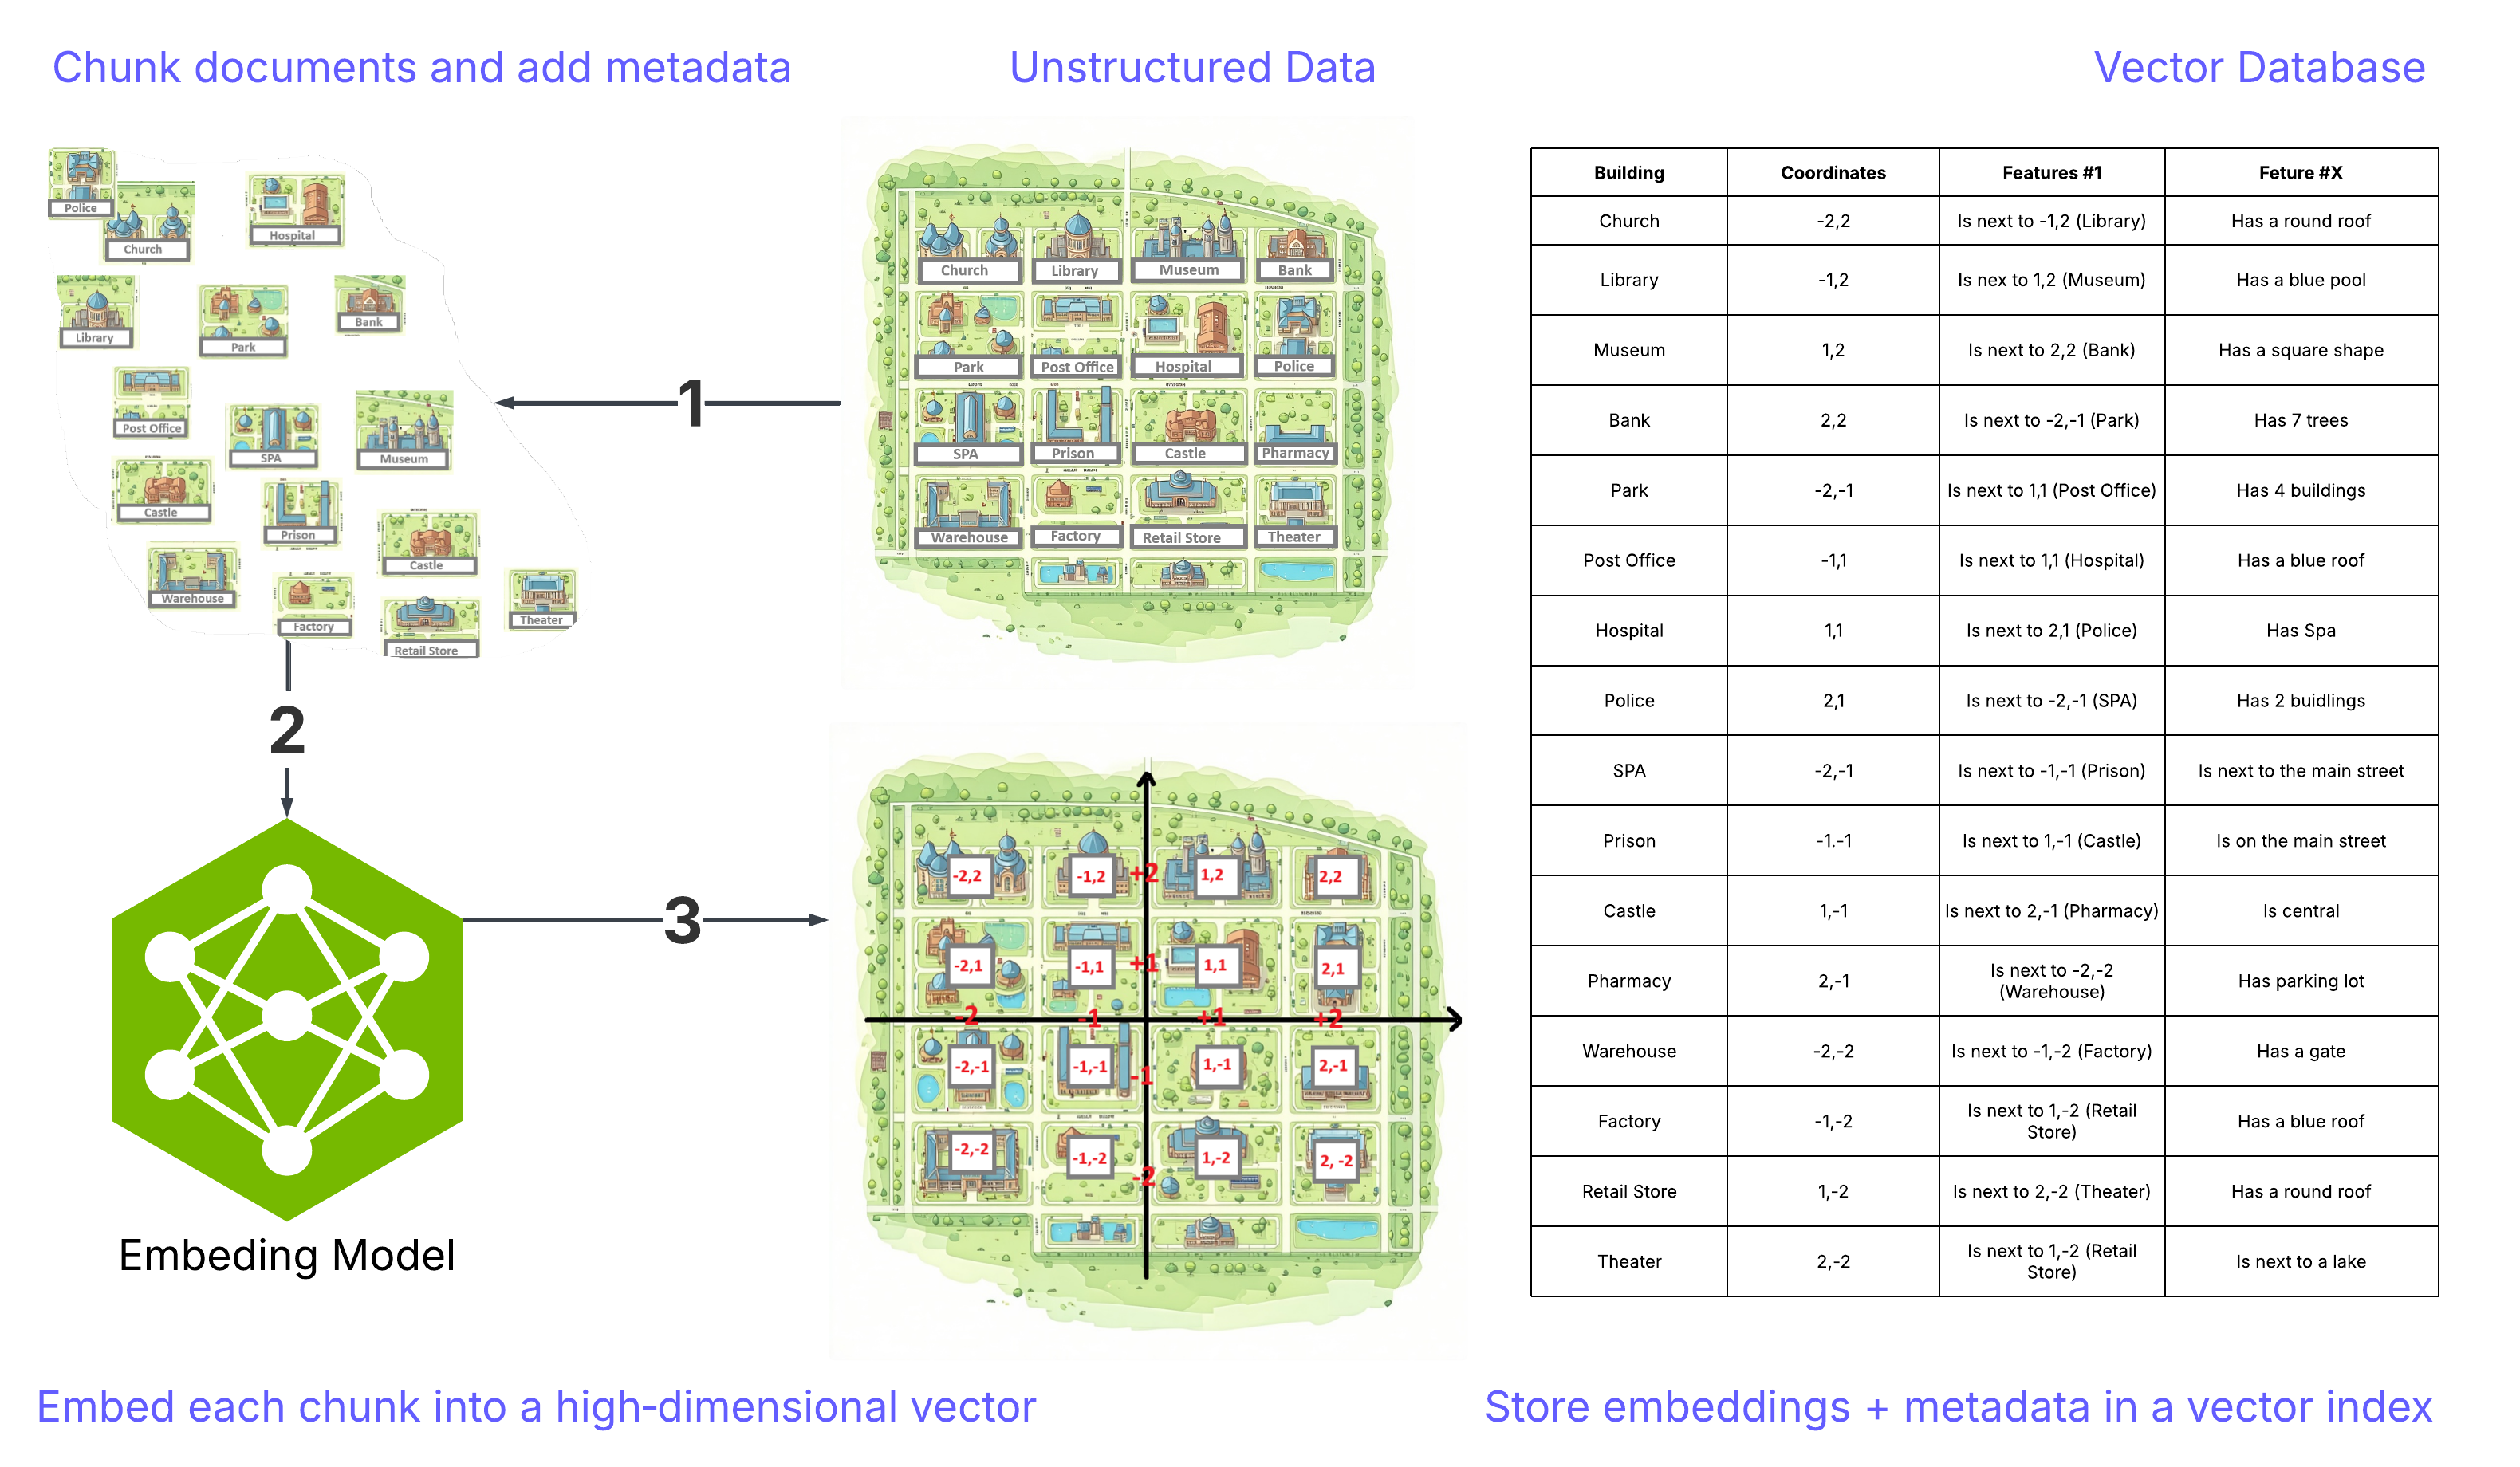
How It Works - Data Preparation:
1) Break documents into chunks and add metadata such as titles, IDs, timestamps, and permissions.
2) Convert each chunk into a high-dimensional vector called an embedding.
3) Store the embeddings with metadata in a vector index (for ANN search) and/or a hybrid index (combining keywords and vectors).
That’s the core of how data is represented in RAG. In practice, it’s more sophisticated: each chunk (a building or part of a building) is stored separately; embeddings usually have hundreds to thousands of dimensions (way beyond our 2D illustration), but the fundamental idea remains the same.
Note: The map representation is just an analogy; the real search happens in high-dimensional space.
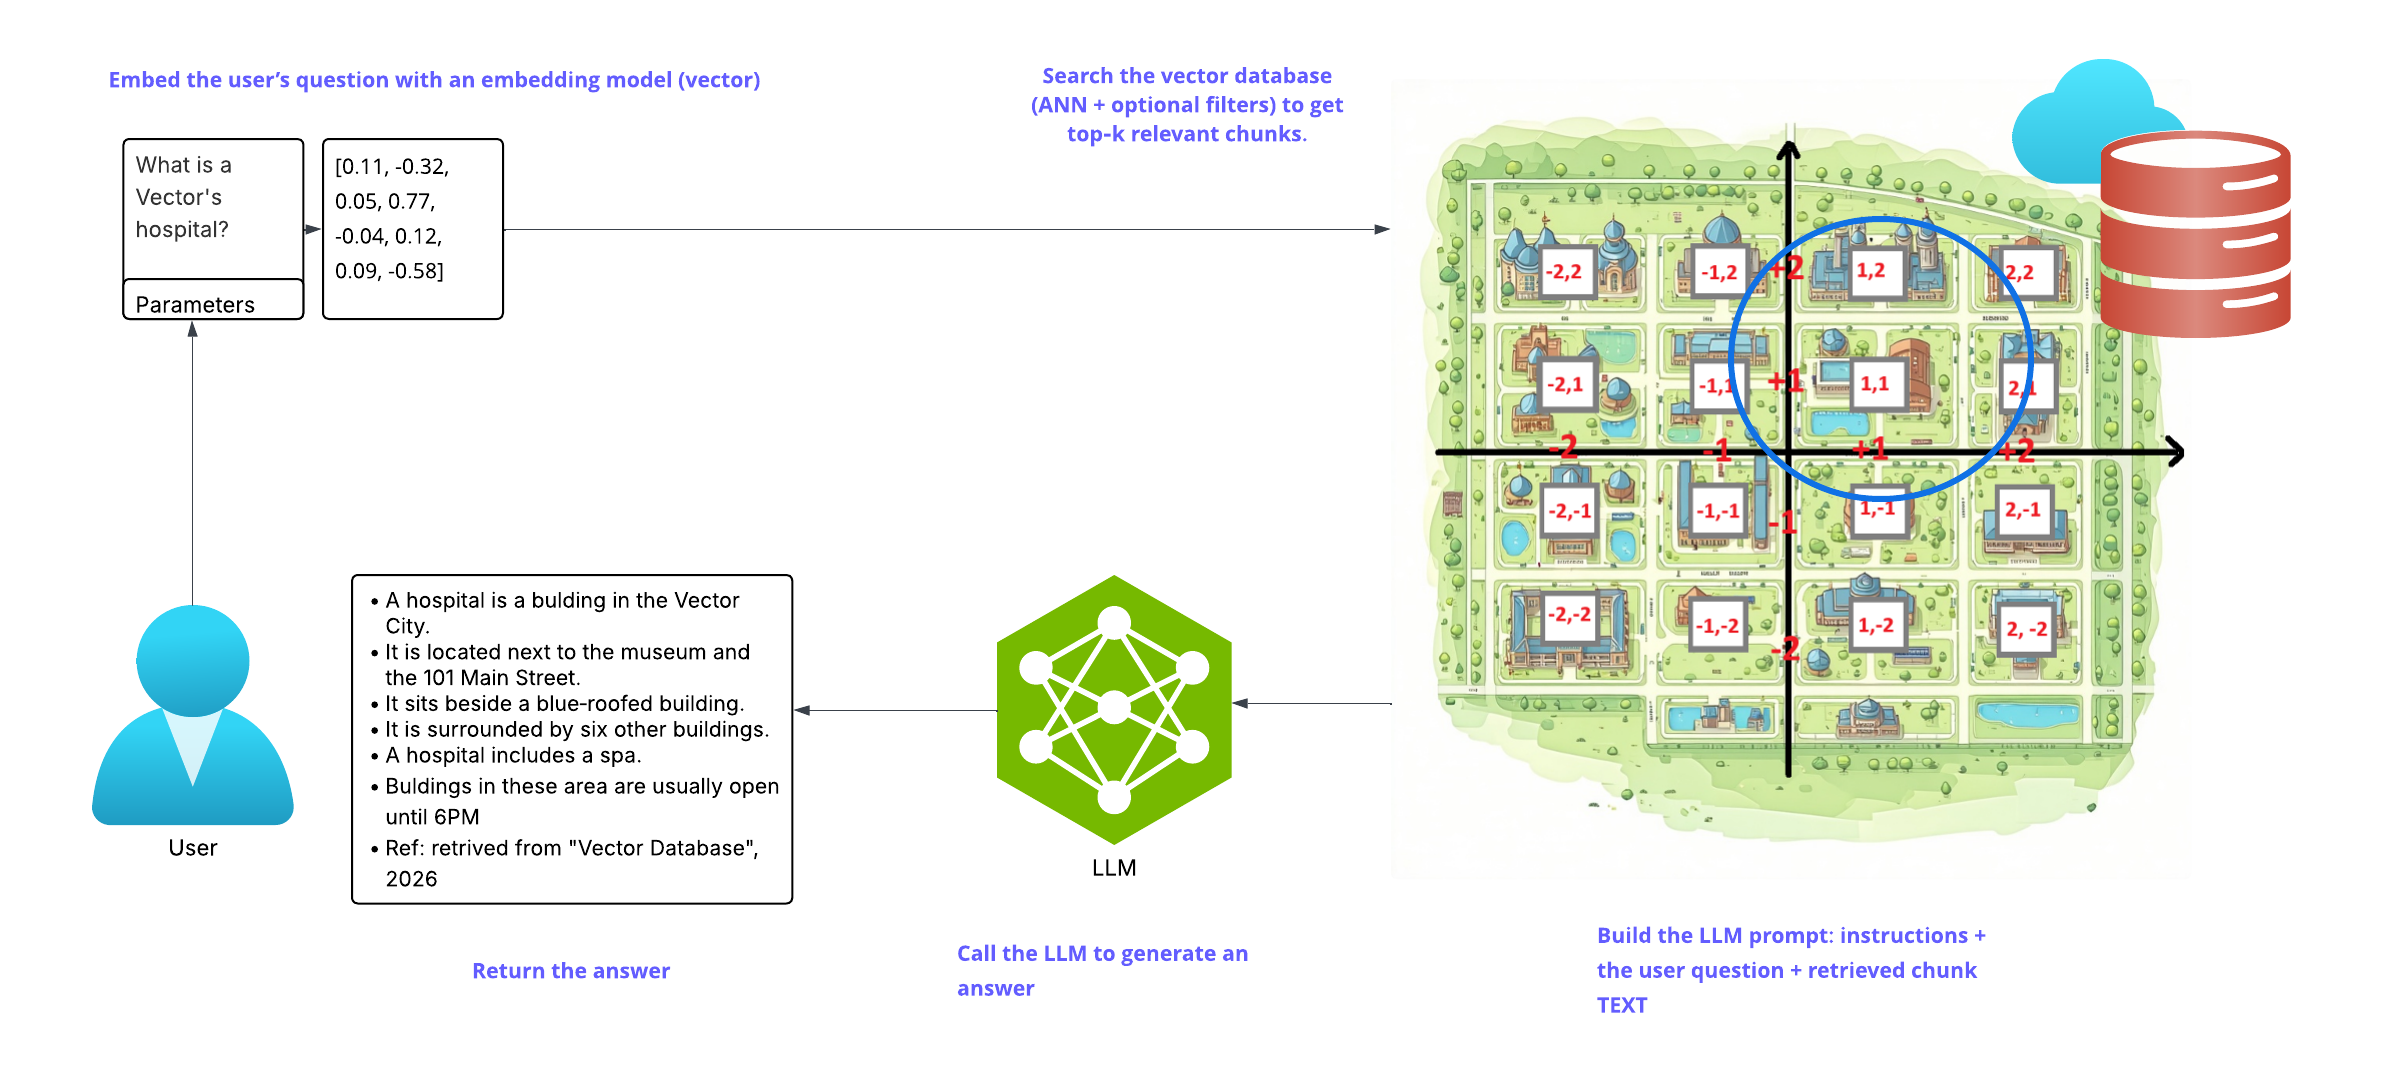
Data Augmentation (A)
Once the data is indexed, here’s what happens when a user submits a query:
• The query is transformed into a vector using the same or a compatible embedding model.
• A search algorithm (e.g., approximate nearest neighbor, ANN) identifies the most relevant chunks.
• Optional filters (such as metadata constraints like date ranges, tags, or permissions) and re-ranking refine the results.
• The retrieved chunks are added to the prompt as context—this is the “augmentation” step that links the model’s answer to your data.
Finally, the system creates a prompt that includes instructions, the user’s question, and the chosen context, then sends it to the LLM.
Common retrieval controls include:
• Top-K: Specifies the number of highest-scoring results to return from a ranked list.
• Top-P Sampling: A method used in generative models to select the smallest set of words whose cumulative probability exceeds a given threshold P, thereby controlling the diversity of the generated text.
• Score thresholds: Defines the minimum similarity or relevance score that a result must meet to be included in the output.
• Filters: Allow results to be included or excluded based on metadata attributes such as source, author, or timestamp.
Data Generation (G)
In the final step, the LLM produces an answer. The response mainly relies on the retrieved context (to reduce hallucinations) but can also draw on general knowledge learned during pretraining.
Many RAG systems also:
• Cite sources to build trust.
• Summarize or compress long contexts.
• Prevent leaks by adhering to permissions and PII policies.
Illustrations below represent the described process.
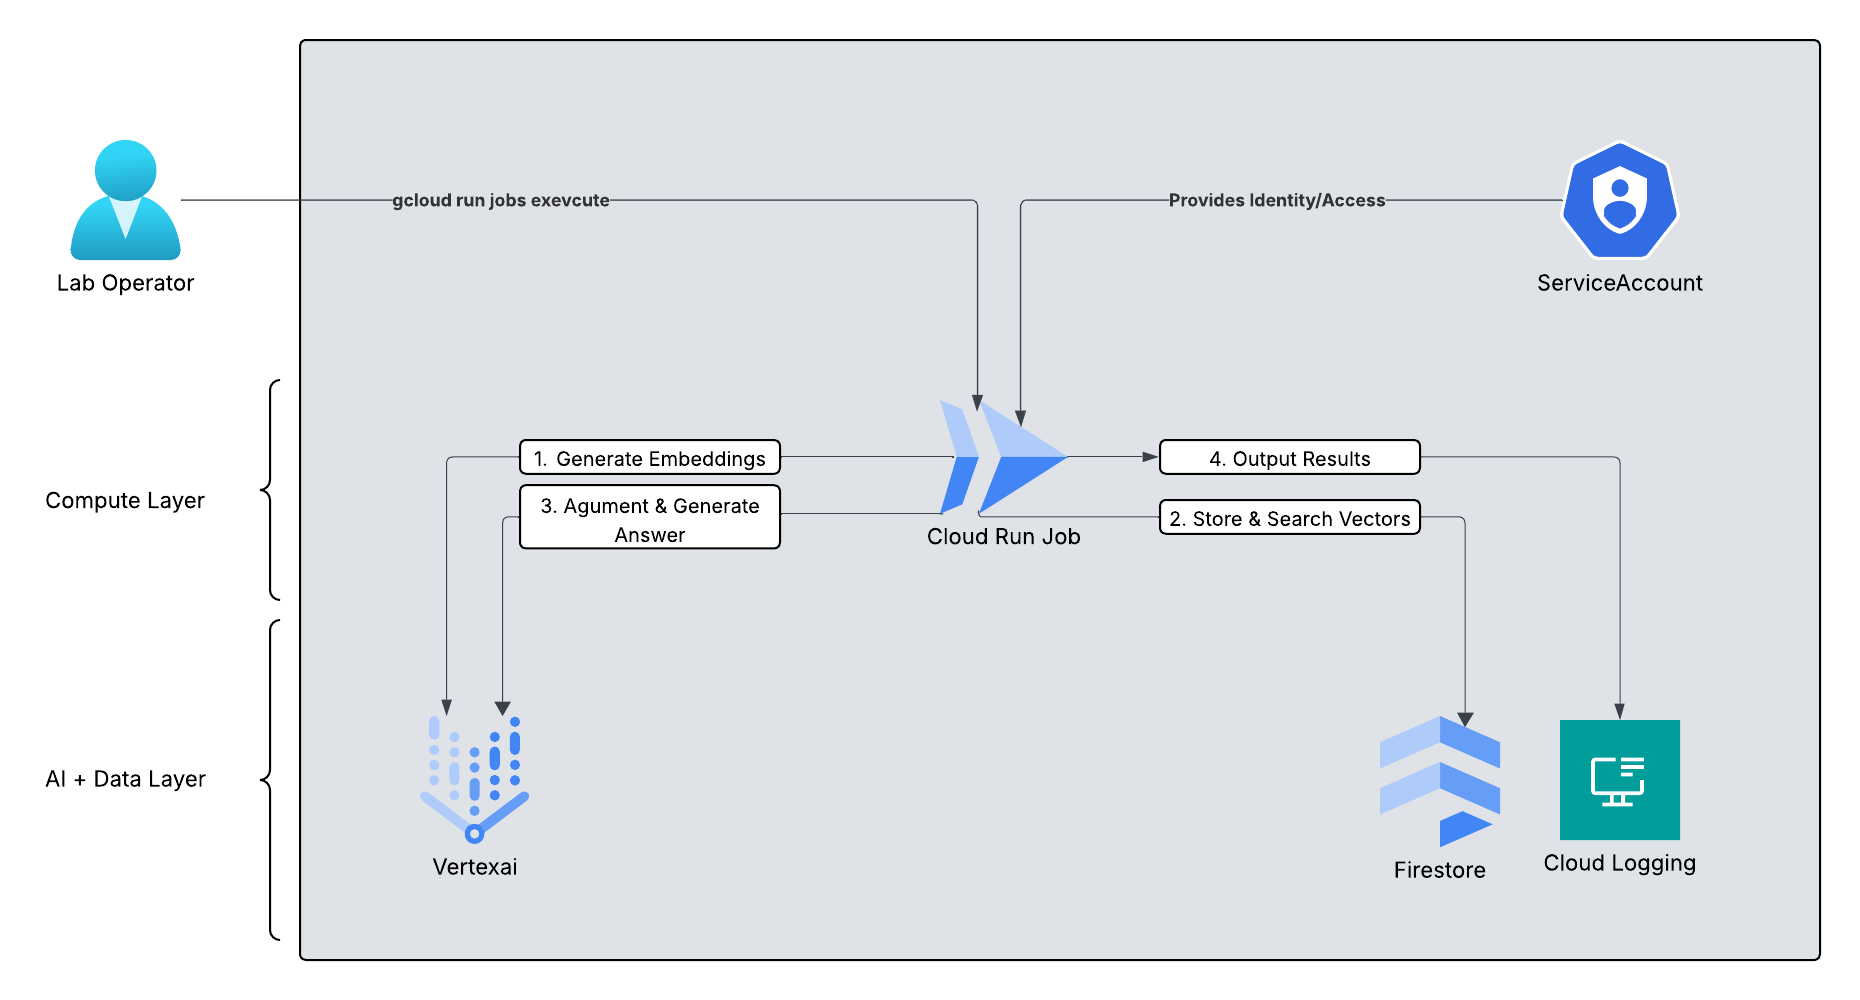
Create a GCP Threat Intelligence Retriever using Firestore and Vertex AI (RAG)
Overview
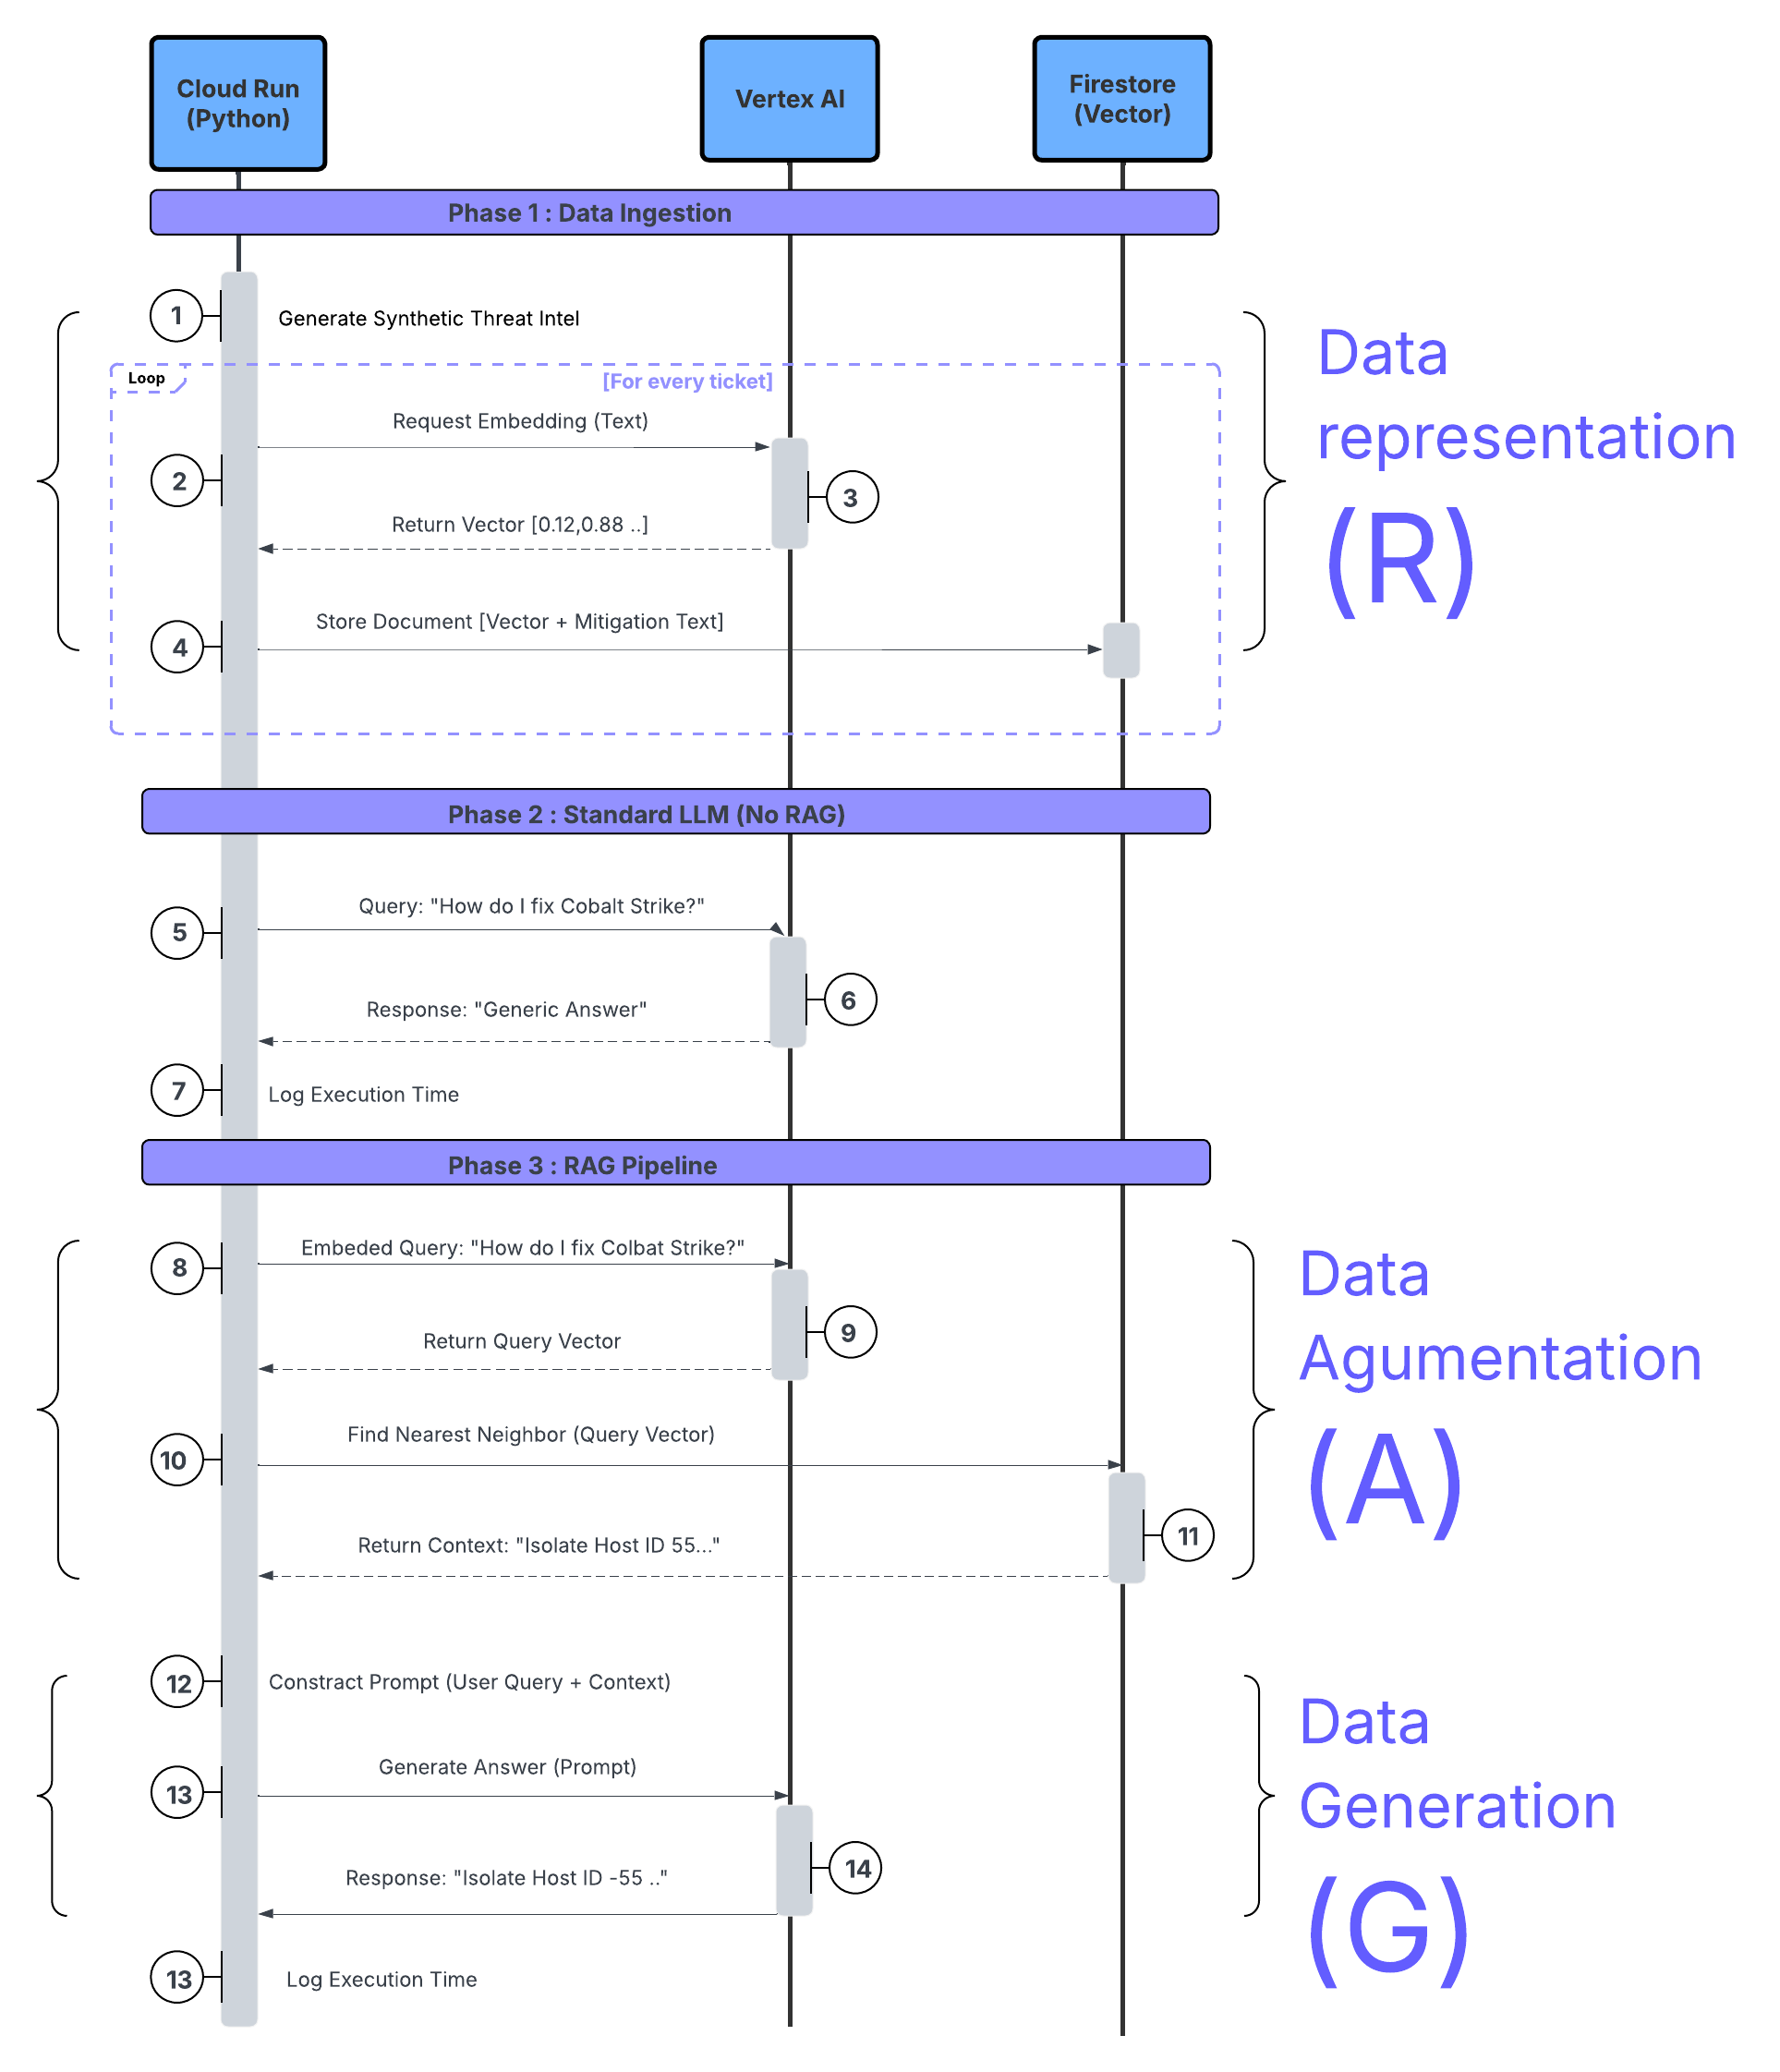
In this guide, we’ll build a fully serverless RAG pipeline. Cloud Run Jobs will securely run the workflow inside our Google Cloud project and VPC. Firestore will store our threat‑intelligence documents and their vector embeddings.
The diagram below shows the high-level system architecture.
What you’ll build
A RAG-powered system that:
• Stores custom threat intelligence data as vector embeddings in Firestore
• Accepts user questions (e.g., about indicators of compromise)
• Converts queries into embeddings and retrieves relevant context
• Augments the prompt with retrieved context
• Uses Vertex AI to generate a grounded answer
Learning Objectives
By the end of this lab, you’ll be able to:
• Use an embedding model (from Vertex AI) to vectorize and store custom data in Firestore
• Implement a retrieval pipeline for semantic search
• Construct RAG prompts and call Vertex AI for grounded generation
• Return well-cited responses to user queries
• We will also demonstrate comparisons to showcase the speed and power of RAG
Part 1: Infrastructure & Environment Setup
We’ll start by setting up the project, enabling the required APIs, and creating a dedicated service account. This ensures our Cloud Run job has the right permissions—without hardcoded credentials.
1. Open Cloud Shell and Configure Variables
Cloud Shell ℹ️
# Set your project ID
export PROJECT_ID="your-project-id"  # Replace with your actual Project ID
export REGION="us-central1"
gcloud config set project $PROJECT_ID

# Enable necessary APIs
gcloud services enable \
  aiplatform.googleapis.com \
  run.googleapis.com \
  cloudbuild.googleapis.com \
  firestore.googleapis.com \
  logging.googleapis.com
2. Create a Dedicated Service Account We follow the principle of least privilege. This service account permits Cloud Run to use Vertex AI, access Firestore for vector storage (read/write), and write to Cloud Logging; it does not provide access to other GCP services.
Cloud Shell ℹ️
# Create the account
gcloud iam service-accounts create rag-lab-sa \
    --display-name="RAG Lab Service Account"

# Grant access to Vertex AI (for embeddings/LLM)
gcloud projects add-iam-policy-binding $PROJECT_ID \
  --member="serviceAccount:rag-lab-sa@${PROJECT_ID}.iam.gserviceaccount.com" \
  --role="roles/aiplatform.user" \
  --condition=None

# Grant access to Firestore (for vector storage)
gcloud projects add-iam-policy-binding $PROJECT_ID \
    --member="serviceAccount:rag-lab-sa@${PROJECT_ID}.iam.gserviceaccount.com" \
    --role="roles/datastore.user" \
    --condition=None

# Grant access to write logs
gcloud projects add-iam-policy-binding $PROJECT_ID \
    --member="serviceAccount:rag-lab-sa@${PROJECT_ID}.iam.gserviceaccount.com" \
    --role="roles/logging.logWriter" \
    --condition=None
Part 2: Database Setup (Firestore)
We need to initialize Firestore and configure it to index our embeddings so we can perform vector searches.
1. Create the Database
Cloud Shell ℹ️
# Create a Firestore database in Native mode
gcloud firestore databases create --location=$REGION
2. Create the Vector Index
This is the most important step. Firestore must identify which field contains vectors to improve search performance.
This operation may take 3-5 minutes to finish on Google’s side.
Cloud Shell ℹ️
gcloud firestore indexes composite create \
  --collection-group=threat_intel \
  --query-scope=COLLECTION \
  --field-config field-path=embedding,vector-config='{"dimension":768,"flat":{}}'
Part 3: The Application Code
Create a folder named rag-lab and create the following two files inside.
File 1: requirements.txt
Cloud Shell: Create requirements.txt ℹ️
# Create directory and enter it
mkdir rag-lab
cd rag-lab

# Create requirements.txt
cat <<EOF > requirements.txt
google-cloud-aiplatform>=1.38.0
google-cloud-firestore>=2.14.0
EOF
File 2: main.py
This script creates synthetic SOC data, uploads it, and then performs a comparison test (RAG vs. No-RAG).
Cloud Shell: Create main.py ℹ️
cat <<'EOF' > main.py
import time
import os
from typing import List
from google.cloud import firestore
from google.cloud.firestore_v1.vector import Vector
from google.cloud.firestore_v1.base_vector_query import DistanceMeasure
from vertexai.language_models import TextEmbeddingModel
from vertexai.generative_models import GenerativeModel
import vertexai

# --- CONFIGURATION ---
PROJECT_ID = os.environ.get("PROJECT_ID")
LOCATION = "us-central1"
COLLECTION_NAME = "threat_intel"

# Initialize Clients
vertexai.init(project=PROJECT_ID, location=LOCATION)
db = firestore.Client(project=PROJECT_ID)

# --- 1. DATA GENERATION ---
def generate_threat_data():
    return [
        {
            "id": "incident-101",
            "type": "C2 Communication",
            "summary": "Network tap detected beaconing pattern to 192.168.1.105 every 5 seconds. Signature matches Cobalt Strike.",
            "mitigation": "Isolate host ID-554 immediately. Block IP 192.168.1.105 at the perimeter. Initiate re-imaging."
        },
        {
            "id": "incident-102",
            "type": "Insider Threat",
            "summary": "User 'jdoe' accessed sensitive HR payroll DB at 3:00 AM via VPN from an unlisted location.",
            "mitigation": "Suspend user account 'jdoe'. Revoke VPN certificates. Notify Legal."
        }
    ]

# --- 2. HELPER: GET EMBEDDINGS ---
def get_embedding(text: str) -> List[float]:
    # Using text-embedding-004
    model = TextEmbeddingModel.from_pretrained("text-embedding-004")
    embeddings = model.get_embeddings([text])
    return embeddings[0].values

# --- 3. INGESTION ---
def ingest_data(data):
    print(f"--- 🚀 Starting Ingestion to Firestore ---")
    collection_ref = db.collection(COLLECTION_NAME)

    for item in data:
        text_to_embed = f"Type: {item['type']}. Summary: {item['summary']}"
        vector_values = get_embedding(text_to_embed)

        doc_payload = {
            "type": item['type'],
            "summary": item['summary'],
            "mitigation": item['mitigation'],
            "embedding": Vector(vector_values)
        }

        collection_ref.document(item['id']).set(doc_payload)

    print(f"✅ Indexed {len(data)} threat records.\n")

# --- 4. THE LAB: RAG VS NO-RAG ---
def run_comparison(query):
    # The shell will now preserve {} correctly
    print(f"🔎 USER QUERY: '{query}'")
    print("------------------------------------------------")

    # Using Gemini 2.0 Flash Lite
    model_id = "gemini-2.0-flash-lite-001"
    model = GenerativeModel(model_id)

    # --- SCENARIO A: STANDARD LLM (NO RAG) ---
    start_time = time.time()
    response_no_rag = model.generate_content(query)
    end_time = time.time()

    print(f"❌ [NO RAG] Response Time: {end_time - start_time:.4f}s")
    print(f"   Response: {response_no_rag.text.strip()}")
    print("------------------------------------------------")

    # --- SCENARIO B: RAG ENABLED ---
    start_rag = time.time()

    # Step 1: Embed the user's query
    query_vector = Vector(get_embedding(query))

    # Step 2: Retrieve from Firestore
    retrieval_start = time.time()
    collection_ref = db.collection(COLLECTION_NAME)

    results = collection_ref.find_nearest(
        vector_field="embedding",
        query_vector=query_vector,
        distance_measure=DistanceMeasure.COSINE,
        limit=1
    ).get()
    retrieval_end = time.time()

    # Step 3: Augment Prompt
    if results:
        doc_data = results[0].to_dict()
        context = f"Threat Type: {doc_data['type']}\nMitigation SOP: {doc_data['mitigation']}"
        print(f"   (Found Context: {results[0].id})")
    else:
        context = "No internal data found."

    prompt = f"""
    You are a SOC assistant. Use the following internal Context to answer the Question.

    Context:
    {context}

    Question:
    {query}
    """

    # Step 4: Generate
    response_rag = model.generate_content(prompt)
    end_rag = time.time()

    print(f"✅ [WITH RAG] Total Time: {end_rag - start_rag:.4f}s")
    print(f"   - Retrieval Overhead: {retrieval_end - retrieval_start:.4f}s")
    print(f"   Response: {response_rag.text.strip()}")
    print("------------------------------------------------")

# --- ENTRY POINT ---
if __name__ == "__main__":
    intel = generate_threat_data()
    ingest_data(intel)
    time.sleep(2)
    run_comparison("What should I do about the Cobalt Strike beaconing?")
EOF
The sequence diagram below shows the execution flow of our system.
Part 4: Containerization & Deployment
We use a Cloud Run Job. Unlike a Service, which waits for web requests, a Job runs our script once (with 3 retries) and then shuts down. This setup is ideal for data processing tasks or batch jobs.
1. Create a Dockerfile
Cloud Shell: Dockerfile ℹ️
cat <<EOF > Dockerfile
FROM python:3.12-slim
WORKDIR /app
COPY requirements.txt .
RUN pip install --no-cache-dir -r requirements.txt
COPY main.py .
CMD ["python", "-u", "main.py"]
EOF
2. Build the Container Image
Cloud Shell: Container Image ℹ️
# Define where to save the image
IMAGE_URI="gcr.io/$PROJECT_ID/rag-lab-worker:v1"

# Build it (this takes ~1-2 minutes)
gcloud builds submit --tag $IMAGE_URI
Part 5: Grant Permissions
Cloud Shell: Granting Permissions ℹ️
gcloud run jobs create rag-lab-job \
  --image $IMAGE_URI \
  --region $REGION \
  --service-account "rag-lab-sa@${PROJECT_ID}.iam.gserviceaccount.com" \
  --set-env-vars PROJECT_ID=$PROJECT_ID
Part 6: Run the Lab
gcloud run jobs execute rag-lab-job --region $REGION
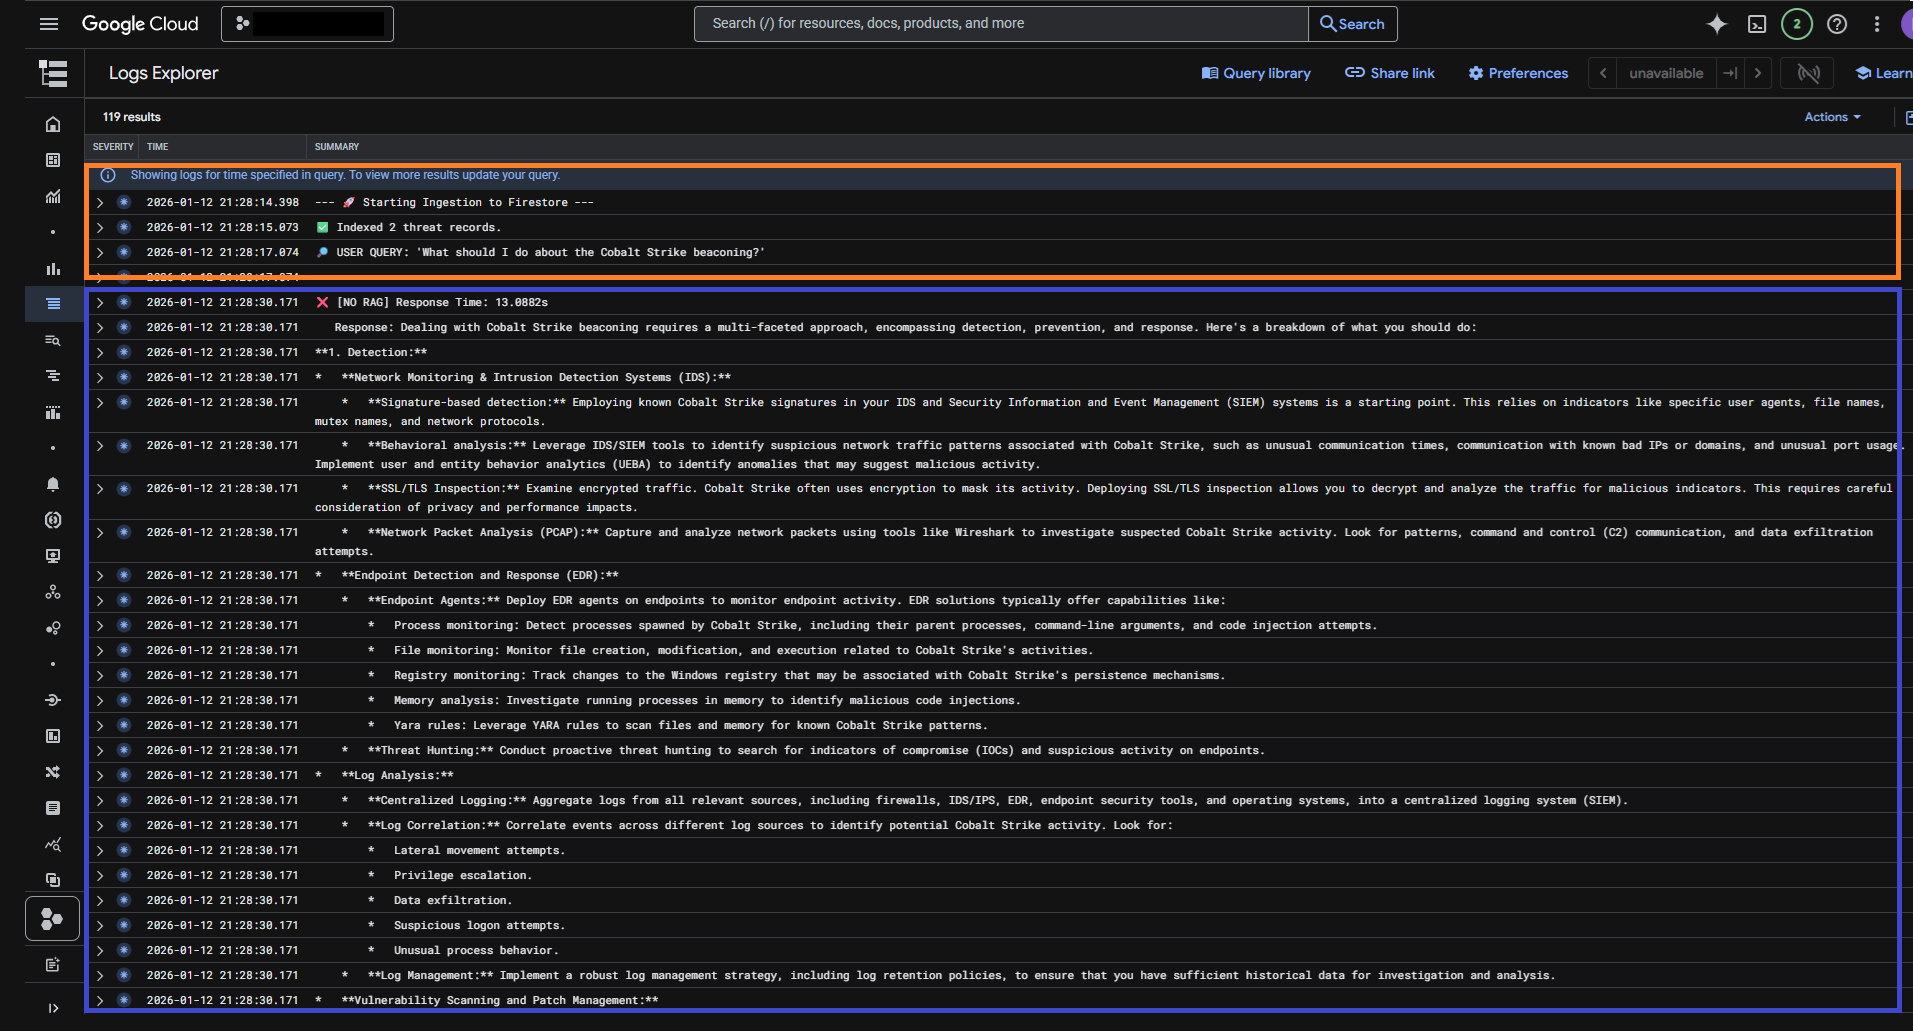
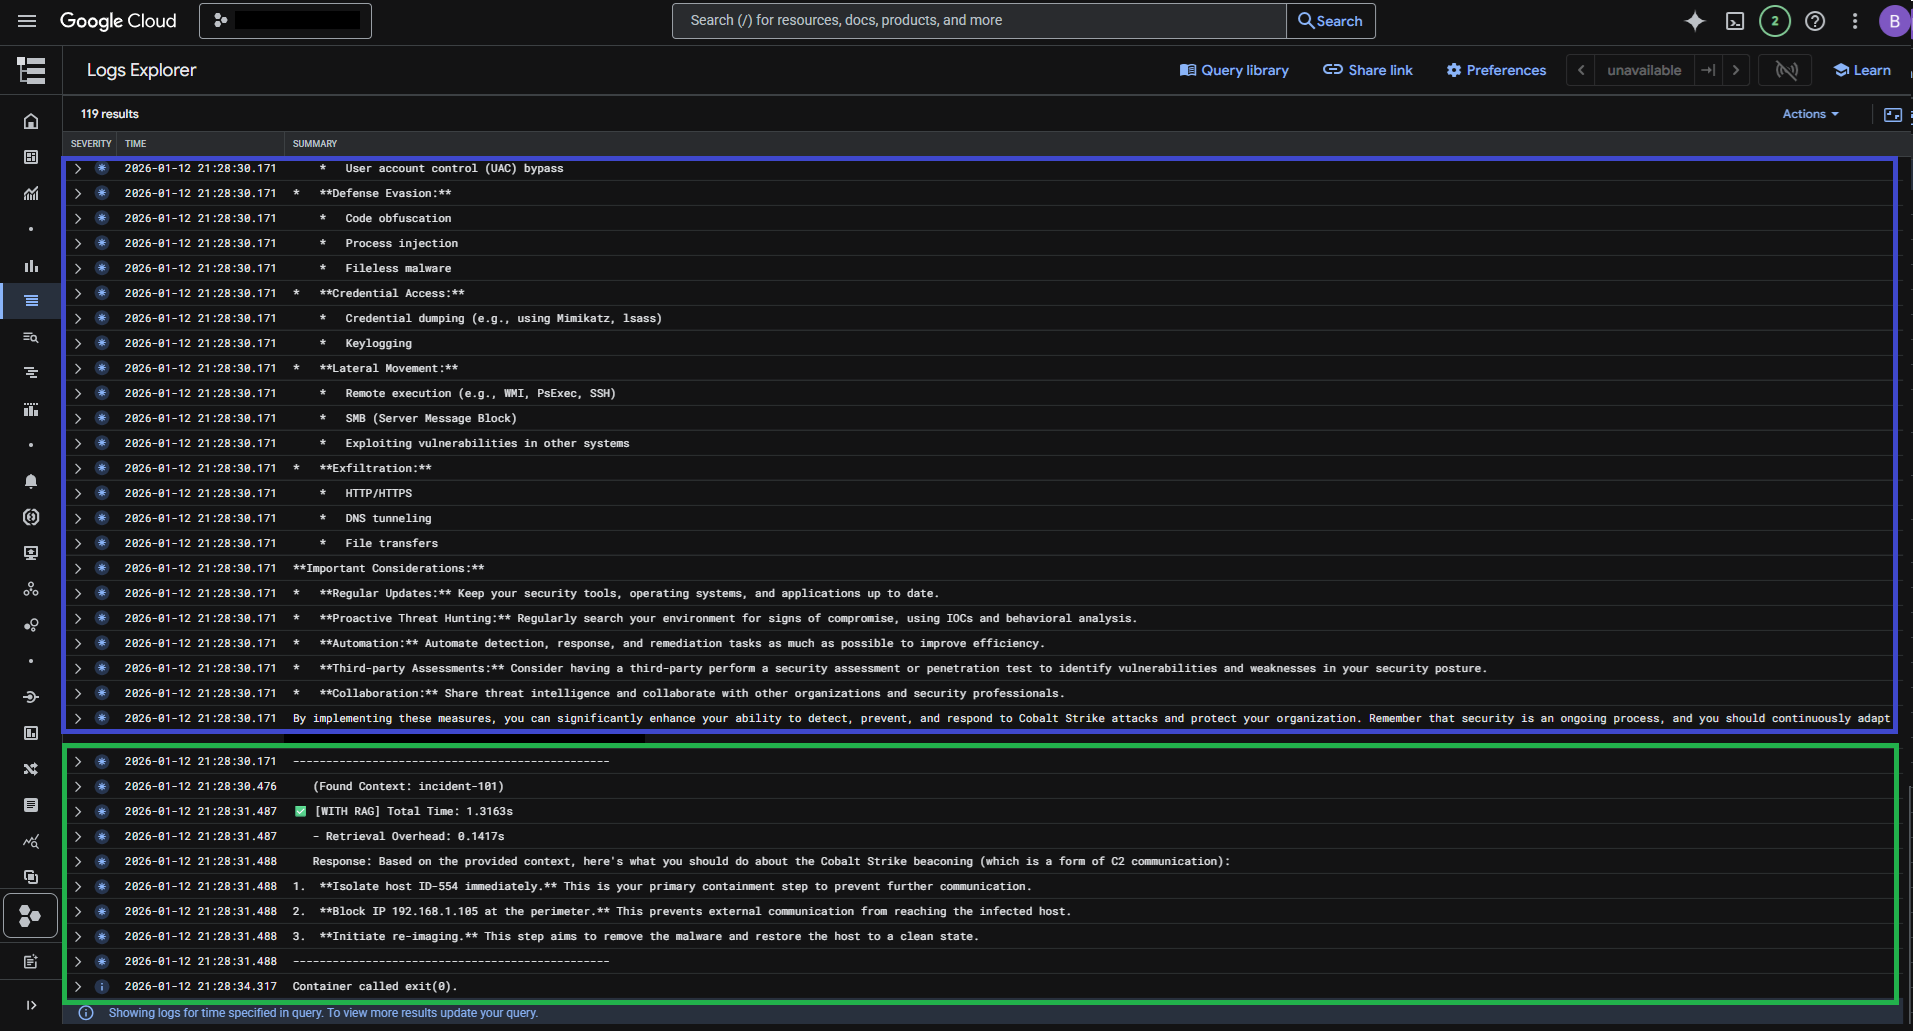
Part 7: Review the results
To view the results:
• Navigate to the Cloud Run Console, then go to Jobs and select rag-lab-job.
• Click on the LOGS tab
• Wait about 30 seconds. You will see a comparison between the generic LLM answer and the specific RAG answer.
Tip: Experiment Try tweaking the prompt in your application code and experiment with different foundation models from Model Garden.
Clean up
List of resources created during the lab:
• IAM Service Account: A dedicated identity (rag-lab-sa) with permissions to access Vertex AI, Firestore, and Logging.
• Firestore Database: A NoSQL database instance (provisioned in Native mode).
• Firestore Composite Index: A specialized vector index used to perform the Nearest Neighbor search on the embedding field.
• Container Registry Image: The Docker image (rag-lab-worker:v1) built by Cloud Build and stored in Google Container Registry (GCR).
• Cloud Run Job: The serverless job definition (rag-lab-job) that executes the container.
• Cloud Build Storage: (Implicit) Google Cloud Storage buckets created automatically to stage the build artifacts.
• Logs: Entries stored in Cloud Logging.
TIP: Clean up
Running this lab and storing logs may incur small charges.
To clean up, please follow the steps below for decommissioning.
Decommissioning Steps
To clean up, open your Cloud Shell and run the following commands. These steps assume you still have the environment variables ($PROJECT_ID and $REGION) set. If not, reset them first.
- Delete the Cloud Run Job
This removes the job definition so it cannot be executed again.gcloud run jobs delete rag-lab-job --region=$REGION --quiet - Delete the Container Image
This removes the stored Docker image to free up storage space.gcloud container images delete gcr.io/$PROJECT_ID/rag-lab-worker:v1 --force-delete-tags --quietIf shell gives you a problem you may need to go to artifact registery and remove gcr.io/rag-lab-worker manually
- Delete the Service Account
This removes the specific identity created for this lab.gcloud iam service-accounts delete rag-lab-sa@$PROJECT_ID.iam.gserviceaccount.com --quiet - Delete the Firestore Index & Data
Vector indexes can incur storage costs. You must delete the index and the data.
To delete the Vector Index:
You will need the Index Name. You can list them first, then delete
Delete Index
###  1. List index  ###
gcloud firestore indexes composite list

#This command will output something like:
#indexes:
#- collectionGroupId: threat_intel
  #fields:
  #- fieldPath: embedding
  #  order: ASCENDING
  #  arrayConfig: 'START_AT_FIRST'
  #  vectorConfig:
  #    dimension: 768
  #   indexingMode: FLAT
  #name: projects/your-project-id/databases/(default)/collectionGroups/threat_intel/indexes/some-index-id
  #ueryScope: COLLECTION
  #state: SERVING

### 2.Delete the Index by Its Name (replace the <eneter name here> at the end of this string with Name of your index) ###

gcloud firestore indexes composite delete projects/$PROJECT_ID/databases/'(default)'/collectionGroups/threat_intel/indexes/<eneter name here> --quiet #replace
Delete the Data (Collection):
Firestore does not have a simple CLI command to “drop table”. The easiest way to clear the data is:
• Go to the Firestore Console.
• Select the threat_intel collection.
• Click the 3-dot menu next to the collection name and select Delete collection.
(Alternative: If you created this project solely for this lab, you can delete the entire database via gcloud alpha firestore databases delete –location=$REGION).
(Optional - Disable APIs) During the initial setup of the lab, several APIs were enabled. You can now disable them using the following instructions:
Caution: Some of these APIs may be required for other services in your lab. Ensure that disabling them will not interrupt any workloads or functionality in your account before proceeding.
Disable APIs (optional)
gcloud services disable aiplatform.googleapis.com
gcloud services disable run.googleapis.com
gcloud services disable cloudbuild.googleapis.com
gcloud services disable firestore.googleapis.com
gcloud services disable logging.googleapis.com
Results
We performed a comparative analysis between a standard LLM query and a query enhanced with RAG, using threat intelligence SOC tickets. Here are the results from each method:
• Without RAG (Standard LLM)
The standard LLM query gave a general response, relying on its overall knowledge base.
• With RAG
The RAG-enabled query included relevant threat intelligence from SOC tickets, resulting in a more specific and contextually accurate response.
Key Observations:
• Without RAG: The response was generic and relied on the model’s general knowledge.
• With RAG: The RAG-enabled query included relevant threat intelligence from SOC tickets, yielding a more specific, contextually accurate response.
These results show the effectiveness of RAG in improving AI responses with domain-specific knowledge.
Summary
During this lab, we demonstrated that Retrieval-Augmented Generation (RAG) improves AI answers. Using custom data from Security Operations Center (SOC) threat‑intel tickets, the RAG‑enabled model produced responses that were clearly more relevant and specific than a standard LLM.
Here’s a short summary of the skills you explored in this lab:
• Cloud Run Jobs: Deployed a serverless job to run the RAG pipeline.
• Artifact Registry: Stored our Docker image.
• Service Account (IAM): Created a dedicated service account for secure access.
• Firestore: Used for storing threat intelligence data with vector embeddings.
• Embeddings and Vector Search: Explored data representation with high-dimensional embeddings and performed vector searches.
• Model Garden: Tried out available models and observed their behaviors.
Although this post is over, I encourage you to continue exploring. Keep experimenting by adding your own ideas, such as ingesting suspicious IP addresses from GCP threat services or VirusTotal into your Vector database. Continue developing your own RAG-enabled solutions and see how they can enhance your security operations.
Stay tuned for more insights and experiments with AI!